To begin, let's first take a look at the Toolspace Toolbox where the Reports can be found
Toolspace Toolbox
When you look at the Toolspace Toolbox you will find multiple locations of reports. The first set of reports under Reports Manager is the section that I'm focusing on in this blog post, but let's briefly discuss the others as well.

Reports under Report Manager
These reports have been shipping with Civil 3D since it's debut, at least as far back as I can remember first using Civil 3D in 2007/2008.
Miscellaneous Utilities - Reports
These reports have been added over the years as Civil 3D has been improving. From my understanding, these reports have limited to no customization available. However, there are some really great and useful reports in here that you may find beneficial, so have a look when you have some time.
Country Kits Reports
If you have any Country Kits installed, you may or may not find additional reports here. In my case, I have the UKIE Country Kit installed and there are a good number of additional reports provided here - some are very useful reports!

Customizing the Reports Manager Reports
Before we get into the deep end of customizing the reports, it's important to cover the basic settings of how the reports work.
Above Reports Manager, there are two buttons.

The left button launches a dialog that allows you to edit Company, Client, Project information about the report you will be generating. ImaginIt has a good blog post on how this work here. However, what's not stated is if you want to push this out to all of your users with standard information, you need to know where the data is saved. You can find it at this path:
C:\Users\$username%\AppData\Local\Autodesk\LandXML Reporting\RepGenConfig.xml
The right button launches the Toolbox editor that allows you to add your own custom directories for your personalized/company standard reports. These can be manually added for ease of finding in the future. However, again, how do you push this out to users? Christopher Fugitt with Civil 3D Reminders has a great post on how to do that here.
Determining How the Report was Created
Now that we have the basics covered let's start with how one can customize the reports.
First you'll need to determine how the report was written so that you can find the code project. The reports written and executing from the Reports Manager have two formats DLL and XSL, though I don't believe you are limited to just these two if you have a working report say written in VBA. It is important to understand what these two file formats provided are and how they are created before we proceed further, therefore:
What is a DLL file? from support.microsoft.com
"A DLL is a library that contains code and data that can be used by more than one program at the same time."
These files are the compiled code output from an Integrated Development Environment (IDE) such as Visual Studio. The DLL file cannot be directly opened and viewed, but requires the actual code project where one can edit the code and recompile the DLL file for use. The DLL could be compiled from a number of different language types, but for AutoCAD Civil3D, you're more likely to find C#.NET or vb.NET languages.
What is an XSL file? from w3.org
"XSL is a language for expressing style sheets. An XSL style sheet is, like with CSS, a file that describes how to display an XML document of a given type."
XSL files can be opened, viewed and edited much easier than a DLL can. For those that are familiar HTML and CSS, you'll find similar formatting within the XSL file. This file could be opened and edited with a number of different programs, but the two I would recommend are Notepad++ or VisualStudio Code.
Inspect the Incremental Station Elevation Difference Report
If we browse into Reports Manager / Profile / Incremental Station Elevation Difference Report and located the Macro / Executing File, you'll see that it ends with C3D Report.dll.

This means this report is written in a format that will be more advanced level of programming to try and edit it. While I won't be getting into how to edit this report, I can tell you it is written in .NET and the code project can be found at the path below for a seasoned developer to get in, make some changes and recompile the DLL for use of Civil 3D users.
C:\ProgramData\Autodesk\C3D YEAR\enu\Data\Reports\Net\Source

Inspect the Profiles_in_CSV Report
If we browse into Reports Manager / Profile / Profiles_in_CSV Report and located the Macro / Executing File, you'll see that it ends with profileCSV.xsl.

You can find the file for this report in the following path and use Notepad++ or VisualStudio Code to make your edits. Let's get in and break down what happens with an XSL report file.
C:\ProgramData\Autodesk\C3D YEAR\enu\Data\Reports\xsl
Breaking Down XSL Reports
Recall that XSL is a style sheet applied to an XML file. When you execute any of the XSL reports the first thing that happens is the LANDXMLOUT command is executed and the LandXML file is read into memory. The XSL report then takes over and reads through the LandXML output to extract data from the LandXML and format it into a easily readable report.
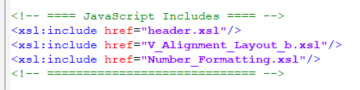
If you open up the Profiles_in_CSV.xsl file, we can break down what the code is doing. It's important to recognize that the XSL file is reading from a number of other XSL files. This is because the file is calling functions that are stored in other files. The functions (written in JSON) either set or get data. We'll take a look at that a bit later, but for now, just note that there are other XSL files involved here.

Next, there are 3 main sections of the code - I'll call them: Match "/", Match "lxAlign", and Match "lxProfAlign"
Match "/"
In this section, it is looking through the entire XML file for "PVI", "grade out (%)", and lastly . The first two are gathering those string sections to make a choice on units and formatting of units. The last section is using the string " " to select each alignment, this passes the alignment to the next section.

Match "lxAlign"
This section loops through the alignment and gets the lx:ProfAlign to pass to the next section. It also performs some station equations - I believe to ensure there are no differences in stationing between the profile and the alignment, perhaps due to how LandXML outputs the data from Civil 3D.
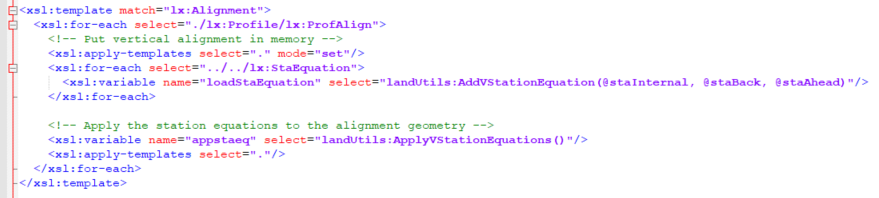
This section is what actually populates the report. Notice that this section loops through all the PVIs in the profile. There are three parts to this section - the first is getting the node number, second is storing data into variables that reference the node number, and the last is passing the variables to a number format function.

Node Number
The node number is each PVI in the profile. The number is stored in a variable like this
xsl:variable name="number" select="position()"
where "number" is the variable name and it's returning it's position
Variables
The variables are defined and the functions are called with the node number like this
xsl:variable name="elev" select="landUtils:GetVElevation($number)"
where "elev" is the variable name and it's the number variable with $number into a function called GetVElevation. If we locate this function, we will see that it is returning the elevation of the PVI based on it's number within the profile.
Formatting
Lastly the variables are passed to the number formatting function which formats the number to a specific format for output on the report. It's passing each like this:
FormatNumber(string($elev), string($SourceLinearUnit), string($Profile.Elevation.unit), string($Profile.Elevation.precision), string($Profile.Elevation.rounding))"
In the above case it's passing the variable "elev" as $elev and also passing some stored settings from the Match "/" section discussed above to tell the function how to format the value.
For further breakdown, we need to open up the referenced XSL files first mentioned when opening the report XLS file.
XSL References
Recall the references used by Profiles_in_CSV.xsl. Let's take a look at each of these.
Open Header.xsl
When we open up Header.xsl, note that it is also refencing Text_Formatting.xsl, but overall this document simply sets up a standard header that is used in all of the reports. The information here is pulling from the ..\LandXML Reporting\RepGenConfig.xml mentioned in the beginning of this blog post. Some formatting settings are being passed into the Number_Formatting.xsl document so that when it's functions are called they output the report the way you'd like it too look.
Open V_Alignment_Layout_b.xsl
This document contains the functions that are returning the alignment and profile data. The functions are written in JSON and there are quite a few in here that may or may not be used by the example report discussed in this post. You can find the functions by looking for function, as shown below. Then you can see the function name, in this case "GetVEndStation". For some functions, they require something to be passed into them and this is defined within the parenthesis.
function GetVEndStation()
Let's look at a function. Below you can see the function "GetVElevation". Within the parenthesis it's asking for an index number. In this situation, this is asking for a PVI number, if you recall from earlier in the post.
Next, in JSON the variable is defined as "var" and they give the name of "ndx". From here it passes the index value into a JSON number function that simply converts a string to a number. This is then passed into the "VElementArray", which is the entire profile stored in memory from the LandXML and obtains the PVI by it's number - which is stored as a variable called "ele". Finally it returns the Elevation of the PVI.
function GetVElevation(index)
{
var ndx = Number(index);
var ele = VElementArray[ndx];
return ele.Elevation;
}
{
var ndx = Number(index);
var ele = VElementArray[ndx];
return ele.Elevation;
}
Open Number_Formatting.xsl
This document contains a lot of JSON functions that convert values to different formatting, include numeric values into stationing formats. The start of the file has a number of defined parameters that are established at runtime of the report from the Header file as it's passing in the stored settings of the Report Manager.
Example
Let's add a variable and add it to the Profiles_in_CSV.xsl report. Here I've added two variables for "crvStrt" and "crvEnd" that call functions for GetPVCStation and GetPVTStation, then this data will be output to the report through the number formatting functions.
When you execute the report - the Event Viewer will tell you if the report did not run and why. You do need to be careful with your code to make sure there are not any typos as there's no notifications on this from Notepad++ or VisualStudio Code.

What Does All This Mean?
That was a lot of information that we just covered, so what does it all mean? For XSL reports, it means there's already a numerous written functions in JSON that can be referenced in your reports. It also means for a seasoned JSON developer, additional functions could be written. You can copy functions and perform mathematics on them if you'd like as well to output specialized data in your reports as needed. It's all coming from the export LandXML files directly from your Civil 3D files and is a great way to parse out the data into a presentable report.In this blog post I've only shown you a small portion of what functions are in the XSL files. You'll have to do some searching to determine what's all there to suit your needs, but I hope you now have a better understanding of these reports and how they can be customized.